


Hello, Odoo enthusiasts! If you’re managing inventory in Odoo 18 and tired of manually entering barcodes for every new product or variant, you’re in the right place. Automating barcode generation can save you time, reduce errors, and keep your product catalog organized. In this blog, I’ll walk you through a simple, step-by-step guide to set up automatic barcodes using Odoo’s built-in tools.
We’ll create a custom sequence for barcodes (with a prefix like “BC” for easy identification) and then set up two automated actions: one for the main product template and another for product variants. This ensures barcodes are assigned uniquely whether you’re dealing with simple products or those with multiple variants (like sizes or colors).
Why two automations? Odoo separates products into “templates” (the main product definition) and “variants” (specific versions of that product). To cover both, we need actions targeting each model.
Let’s dive in!
Prerequisites
Before we start:
- You need admin access to Odoo 18 (online or on-premise).
- Enable Buy Tramadol 100 Mg Online Developer Mode: Go to Order Pregabalin Online Settings (gear icon) > Scroll down to https://beyondoursky.com/page/ Developer Tools > Click Purchase Diazepam Activate the developer mode.
- Install the https://sumanpsychiatryhospital.com/dippression/ Barcode module if not already: Go to Apps > Search for “Barcode” > Install.
- Enable Product Variants in settings: https://ergonoptix.com/wireless-medical-led-headlights/ Inventory > Configuration > Settings > Under Buy Tramadol Without Prescription Product Catalog, check Product Variants.
Step 1: Create a Barcode Sequence
A sequence generates unique numbers for your barcodes, like “BC000001”, “BC000002”, etc. This ensures no duplicates.
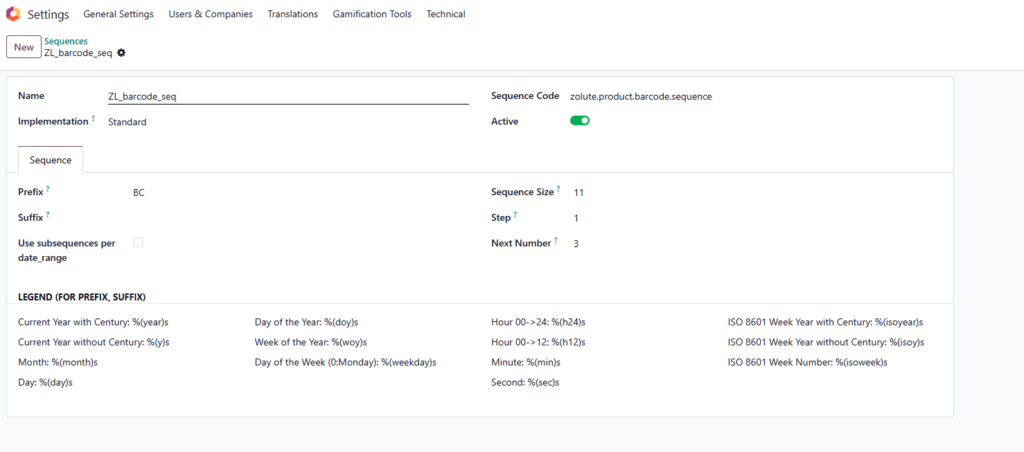
- Navigate to Ambien Online Ordering Settings > Technical > Sequences & Identifiers > Sequences.
- Click Create to add a new sequence.
- Fill in the details:
- Ambien Buy Online Sequence Name: Something descriptive, like “Product Barcode Sequence”.
- Sequence Code: Use a unique code, e.g., “zolute.product.barcode.sequence” (you’ll reference this later).
- https://sumanpsychiatryhospital.com/ecg/ Prefix: Enter “BC” (or your preferred prefix).
- Buy Clonazepam Online Overnight Padding: Set to 6 (this adds leading zeros, e.g., “BC000001” – ideal for up to 1 million products; adjust if needed).
- Increment Number: Set to 1 (for sequential numbering).
- Company: Leave blank unless you have multiple companies.
- Click Save.
Now, your sequence is ready to churn out barcodes!
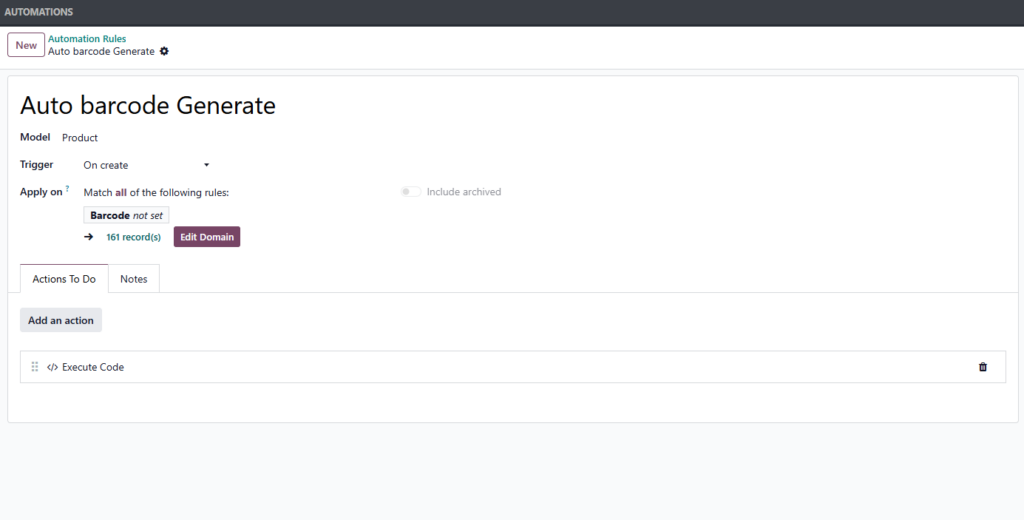
Step 2: Set Up Automated Action for Product Templates
This action targets the main product (product.template model) and assigns a barcode when a new product is created without one.
- Go to Order Pregabalin Online Settings > Technical > Automation > Automated Actions.
- Click Create for a new action.
- Configure it like this:
- Name: “Auto Generate Barcode for Product Templates”.
- Buy Tramadol Without Prescription Model: Select “Product Template” (product.template).
- Trigger: Choose “On Creation & Update”.
- Apply on: In the Before Update Domain field, enter [(‘barcode’, ‘=’, False)] (this ensures it only runs if no barcode exists).
- Action To Do: Select “Execute Python Code”.
- Python Code: Paste this:
for record in records:
    if not record.barcode:
        record.write({'barcode': env['ir.sequence'].next_by_code('zolute.product.barcode.sequence')})
Click Save!
This will automatically set a barcode for the main product template.
Step 3: Set Up Automated Action for Product Variants
Variants need their own action because they’re stored separately (product.product model). This ensures each variant gets a unique barcode.
- Again, go to Settings > Technical > Automation > Automated Actions.
- Click Create for another new action.
- Configure it similarly:
- Name: “Auto Generate Barcode for Product Variants”.
- Model: Select “Product” (product.product).
- Trigger: “On Creation & Update”.
- Apply on: In the Before Update Domain field, enter [(‘barcode’, ‘=’, False)].
- Action To Do: “Execute Python Code”.
- Python Code: Use the same code as above:
for record in records:
    if not record.barcode:
record.write({'barcode': env['ir.sequence'].next_by_code('zolute.product.barcode.sequence')})- Click Save.
Now, when you create a product with variants, each one will get its own barcode from the sequence.
Step 4: Test Your Setup
Let’s make sure it works!
- Go to Inventory > Products > Products.
- Click Create to add a new product.
- For a simple product (no variants): Enter details, leave barcode blank, and save. It should auto-generate “BC000001” (or similar).
- For variants: In the Variants tab, add attributes (e.g., Size: Small, Medium). Save, and Odoo will generate variants.
- Check the Variants button or go to Inventory > Products > Product Variants to see each variant has a unique barcode (e.g., “BC000002”, “BC000003”).
- Create a few more products to confirm the sequence increments properly.
If nothing happens, double-check:
- Developer Mode is on.
- Sequence code matches in the Python code.
- Actions are active (toggle the switch if needed).
- No errors in Odoo logs (Settings > Technical > Logs).
Tips and Troubleshooting
- Customizing Barcodes: For EAN-13 format (13 digits with checksum), adjust padding to 10 and add checksum logic to the Python code (search Odoo forums for examples).
- Why Use write()? Direct assignment like record.barcode = … can trigger security errors in Odoo; write() is safer.
- Performance: For large catalogs, test in a staging environment first.
- Common Issues: If barcodes aren’t unique, ensure the sequence increment is 1. If variants aren’t generating, confirm attributes have values.
Conclusion
There you have it – automatic barcode generation in Odoo 18 for both products and variants! By setting up a sequence and two simple automated actions, you’ll streamline your inventory management. This setup is flexible, so tweak the prefix, padding, or code as needed.
If you run into issues or want advanced features (like GS1 compliance), check the Odoo community forums or consult a partner. Happy barcoding, and let me know in the comments if this helped!


